It is not recommended to build the server by yourself. because there will be many obstacles like IP is blocked by some other mail servers. then it is very difficulty to send mails to those servers. And it is more easier that we look for some mail services, like google workspace. Anyway I still record it here for reference.
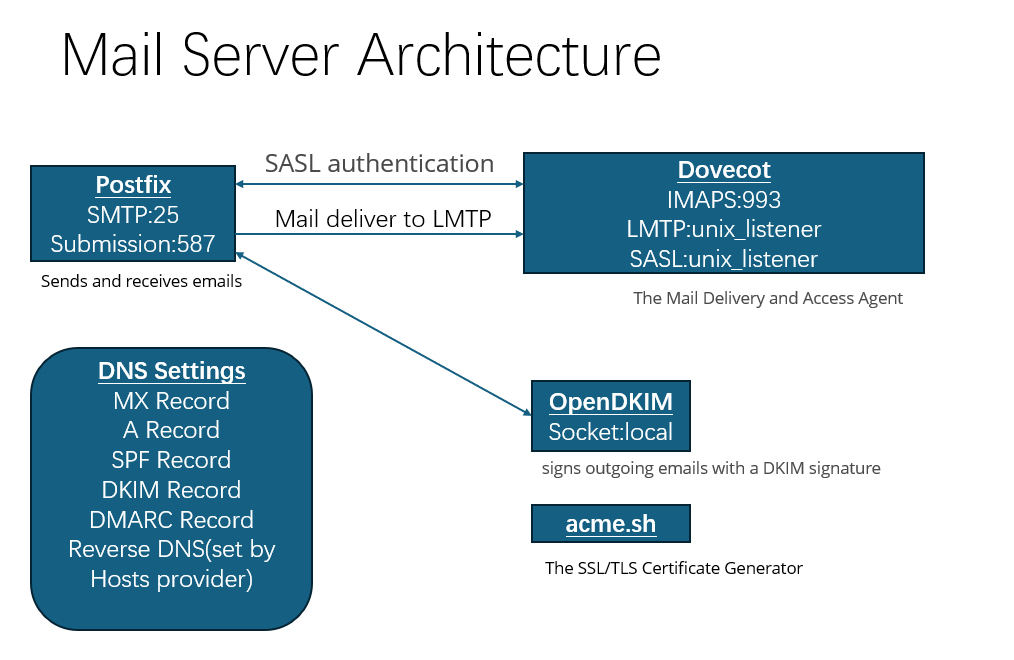
Building a trusted mail server ensures your emails are delivered securely and reliably, avoiding spam filters and establishing credibility. In this guide, I’ll walk you through setting up a mail server with four key tools: Postfix, Dovecot, OpenDKIM, and acme.sh. I’ll explain each tool’s role, the ports they use, and provide concise installation and configuration steps on a Linux system (e.g., Oracle Linux 8.10, example domain mail.example.com, example IP 192.0.2.10). We’ll start with DNS settings—including Reverse DNS—for trust, then cover software setup with file-based user authentication for sending and accessing emails.
DNS Settings for Trustworthiness
To make your mail server credible and ensure emails reach inboxes, configure these DNS records for example.com upfront:
- MX Record (Mail Exchange):
- Name: example.com
- Type: MX
- Value: 10 mail.example.com
- Role: Directs email traffic to your server.
- A Record (Address):
- Name: mail.example.com
- Type: A
- Value: 192.0.2.10
- Role: Maps your mail server hostname to its IP address.
- SPF Record (Sender Policy Framework):
- Name: example.com
- Type: TXT
- Value: “v=spf1 ip4:192.0.2.10 ~all”
- Role: Authorizes your IP to send emails for example.com, preventing spoofing.
- DKIM Record (DomainKeys Identified Mail):
- Name: mail._domainkey.example.com
- Type: TXT
- Value: (Generated later with OpenDKIM, e.g., “v=DKIM1; k=rsa; p=…public_key…”)
- Role: Publishes your DKIM public key to verify signed emails.
- DMARC Record (Domain-based Message Authentication):
- Name: _dmarc.example.com
- Type: TXT
- Value: “v=DMARC1; p=reject; rua=mailto:dmarc@example.com; ruf=mailto:dmarc@example.com; fo=1”
- Role: Instructs receivers on handling unauthenticated emails (start with p=reject for rejecting sending).
- Reverse DNS (rDNS/PTR Record):
- IP: 192.0.2.10
- Type: PTR
- Value: mail.example.com
- Role: Maps your IP back to your mail server’s hostname, proving legitimacy to recipient servers. Many email providers (e.g., Gmail) check rDNS to filter spam.
- How to Set: This isn’t configured via your domain’s DNS provider but through your VPS/hosting provider’s control panel (e.g., Vultr). Log in, find the IP management section, and set the PTR record to mail.example.com. Verify with:
- dig -x 192.0.2.10
- Expect: mail.example.com in the answer.
Set these records (except rDNS) with your DNS provider, and configure rDNS with your hosting provider before proceeding.
Software Overview and Their Roles
- Postfix – The Mail Transfer Agent (MTA)
- Role: Role: Postfix sends and receives emails via SMTP, routing messages or storing incoming emails, with SASL authentication using a file for user credentials.
- Ports:
- 25 (SMTP): Server-to-server email transfers.
- 587 (Submission): Secure client email submission with authentication and TLS.
- Dovecot – The Mail Delivery and Access Agent
- Role: Dovecot delivers emails to mailboxes (via LMTP), provides IMAP/POP3 access, and authenticates users for both sending (via Postfix SASL) and login, using a password file.
- Ports:
- 143 (IMAP): Syncs emails across devices.
- 993 (IMAPS): Secure IMAP over SSL/TLS.
- 110 (POP3): Downloads emails to clients.
- 995 (POP3S): Secure POP3 over SSL/TLS.
- 24 (LMTP): Internal delivery from Postfix to Dovecot.
- OpenDKIM – The Email Authentication Tool
- Role: OpenDKIM signs outgoing emails with a DKIM signature, proving authenticity and boosting trust.
- Port: Uses a local socket (e.g., /var/run/opendkim/opendkim.sock), not a public port.
- acme.sh – The SSL/TLS Certificate Generator
- Role: acme.sh automates free SSL/TLS certificate issuance (e.g., from Let’s Encrypt or ZeroSSL) to encrypt email traffic.
- Port: Requires 80 (HTTP) temporarily for HTTP-01 validation.
Installation and Configuration
Set up each tool on your Linux server (example domain example.com, mail server mail.example.com, IP 192.0.2.10). We’ll use a file (/etc/dovecot/users) for user authentication.
1. Postfix Installation and Configuration
- Install:
sudo dnf install postfix - Configure (/etc/postfix/main.cf):
myhostname = mail.example.commydomain = example.commydestination = localhostvirtual_mailbox_domains = example.comvirtual_transport = lmtp:unix:/var/run/dovecot/lmtp# To Dovecotsmtpd_tls_cert_file = /etc/ssl/certs/mail.example.com.cersmtpd_tls_key_file = /etc/ssl/certs/mail.example.com.keysmtpd_use_tls = yes# SASL settingssmtpd_sasl_type = dovecotsmtpd_sasl_path = private/authsmtpd_sasl_auth_enable = yessmtpd_sasl_security_options = noanonymoussmtpd_recipient_restrictions = permit_sasl_authenticated, reject_unauth_destinationsmtpd_tls_auth_only = yes
- Edit /etc/postfix/master.cf (uncomment or add):
- submission inet n – n – – smtpd
- -o smtpd_tls_security_level=encrypt
- -o smtpd_sasl_auth_enable=yes
- Start:
sudo systemctl enable postfixsudo systemctl start postfix
- Ports: Open 25 and 587:
sudo firewall-cmd --add-port=25/tcp --permanent sudo firewall-cmd --add-port=587/tcp --permanentsudo firewall-cmd --reload
2. Dovecot Installation and Configuration
- Install:
sudo dnf install dovecot
- Configure with File-Based Authentication:(can be replaced with database auth or LDAP)
- Generate password:
doveadm pw -s SHA512-CRYPTEnter a password (e.g., securepass), copy the hash.
- Create /etc/dovecot/users:
user@example.com:{SHA512-CRYPT}$6$randomsalt$longhash::::
- Set permissions:
sudo chown dovecot:dovecot /etc/dovecot/userssudo chmod 600 /etc/dovecot/users
- /etc/dovecot/dovecot.conf:
protocols = imap lmtp
- /etc/dovecot/conf.d/10-mail.conf:
mail_location = maildir:/var/mail/%d/%n
- /etc/dovecot/conf.d/10-master.conf (open LMTP and SASL):
service lmtp { unix_listener lmtp {}}service auth { unix_listener /var/spool/postfix/private/auth { mode = 0660 user = postfix group = postfix } }
- /etc/dovecot/conf.d/10-ssl.conf:
ssl = yesssl_cert = </etc/ssl/certs/mail.example.com.cerssl_key = </etc/ssl/certs/mail.example.com.key
- Start:
sudo systemctl enable dovecotsudo systemctl start dovecot
- Ports: Open 993:
sudo firewall-cmd --add-port=993/tcp --permanentsudo firewall-cmd --reload
3. OpenDKIM Installation and Configuration
- Install:
sudo dnf install opendkim
- Configure:
- Generate keys:
sudo opendkim-genkey -t -s mail -d example.comsudo mv mail.private /etc/opendkim/keys/example.com/mail.privatesudo mv mail.txt /etc/opendkim/keys/example.com/mail.txt
- Update DNS record mail._domainkey.example.com with mail.txt content (e.g., “v=DKIM1; k=rsa; p=…”).
- /etc/opendkim.conf:
Mode svDomain example.comKeyFile /etc/opendkim/keys/example.com/mail.privateSelector mailSocket local:/var/run/opendkim/opendkim.sock
- Integrate with Postfix (/etc/postfix/main.cf):
milter_default_action = acceptmilter_protocol = 6smtpd_milters = unix:/var/run/opendkim/opendkim.socknon_smtpd_milters = $smtpd_milters
- Generate keys:
- Start:
sudo systemctl enable opendkim sudo systemctl start opendkim
4. acme.sh Installation and Certificate Generation
- Install:
curl https://get.acme.sh | sh source ~/.bashrc- Installs acme.sh and updates PATH.
- Configure Web Server (Nginx for HTTP-01 validation):
- Install Nginx:
sudo dnf install nginx
- Configure /etc/nginx/conf.d/mail.example.com.conf:
server { listen 80; server_name mail.example.com; root /var/www/html; index index.html; }
- Start Nginx:
sudo systemctl enable nginx sudo systemctl start nginx
- Install Nginx:
- Generate Certificate:
acme.sh --issue -d mail.example.com -w /var/www/html- Install certs for Postfix and Dovecot:
acme.sh --install-cert -d mail.example.com--key-file /etc/ssl/certs/mail.example.com.key --fullchain-file /etc/ssl/certs/mail.example.com.cer --reloadcmd "chmod 644 /etc/ssl/certs/mail.example.com.key;systemctl restart nginx dovecot postfix"
- Install certs for Postfix and Dovecot:
- Port: Open 80 temporarily:
sudo firewall-cmd --add-port=80/tcp --permanentsudo firewall-cmd --reload
- Add SSL to Nginx (optional):
server { listen 443 ssl; server_name mail.unki.net; root /usr/share/nginx/html; index mailindex.html; ssl_certificate /etc/ssl/certs/mail.unki.net.cer; ssl_certificate_key /etc/ssl/certs/mail.unki.net.key;}
Final Steps
- Test:
- Send a test email: echo “Test” | mail -s “Test Email” test@anotherdomain.com.
- Verify with Mail-Tester.
- Install thunderbird and config to receive and send mails.
- Monitor:
- Postfix: /var/log/maillog.
- Dovecot: /var/log/maillog.
- Nginx: /var/log/nginx/error.log (for SSL issues).
- IP Warm-Up: Start with 10-50 emails/day, increasing gradually.
Conclusion
A trusted mail server starts with solid DNS setup (MX, SPF, DKIM, DMARC, rDNS), followed by Postfix and Dovecot using a file (/etc/dovecot/users) for user authentication, OpenDKIM for signatures, and acme.sh for SSL. Configured ports (25, 587, 143, 993, etc.) and file-based credentials ensure security and trust. This setup powers my server—and it can power yours too!